
When you're working in a real project with a real team, it's very important to have a development workflow that allows you to spend time developing actual features instead of constantly fixing broken releases. This is article is a quick guide on how to setup a CI/CD pipeline for your Python project using Gitlab CI.
Continuous Integration
Continuous Integration is the practice of integrating the work of a team of developers into a shared repository as frequently as possible. The goal is to detect and fix errors fast instead of waiting for things to pile up. When you're integrating code frequently (and by frequently I mean daily), you're basically de-risking your releases because of a very simple principle: less code to integrate == less things that can go wrong.
The key practices to do CI successfully are:
- Integrate small and atomic branches into a shared repository
- Before integrating, the entire application should be tested automatically
- Everytime a branch is integrated, it should be built automatically
- When the release is built, it should deploy automatically to a staging server
In other words: you should iterate fast and automate your process.
Continuous Delivery
Continuous Delivery on the other hand is the practice of deploying your code to production as frequently as possible, with the goal of reducing the possibilities of something going wrong when releasing new features or bug fixes. Ideally, deployment should be done automatically.
In other words:
- CI = merge frequently into master
- CD = deploy master frequently to production
Automated testing
When you're adding new code to the repository you must add unit or functional tests, this is key for having a sane CI/CD workflow. A lot of beginners think the main benefit of testing is knowing your code works, but the real benefit is that you're making sure if someone breaks your code in the future they know about it and fix their code (or your test).
This is why automated testing is so important, because if you're doing frequent integrations you need to make sure you're not breaking anything every single time. I won't cover unit and functional testing in this article, but if you want to get started with test-driven development you should start reading Obey the testing goat!.
Pipeline stages
In this guide I use Gitlab CI to execute the pipeline everytime a branch is merged into master, but you're free to use a different service like CircleCI, TravisCI or Codeship.
Think about a CI/CD pipeline as a set of jobs or stages that we execute everytime a new branch is being merged into master. In this guide we are running five stages: three for static code analysis, one for our test suite and one more to deploy our new release.
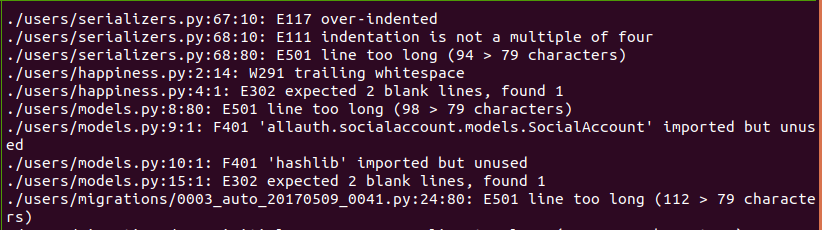
1. Flake8
This is a code analyzer to enforce code style rules like the pep8 specification. Running this is very straightforward:
flake8 --exclude='.git,venv,*migrations*,static/lib'
If everything is great no output will be returned and the pipeline job will succeed, but if there are errors it will print something like this and return 1 as the exit code.
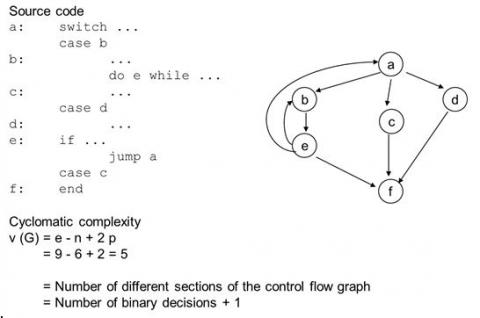
2. Radon
This is a Python tool to determine the cyclomatic complexity of our code, which means that this stage will throw an alert and fail if our code became too complex.
radon cc -s -a --ignore='venv' .
radon mi -s --ignore='venv' .
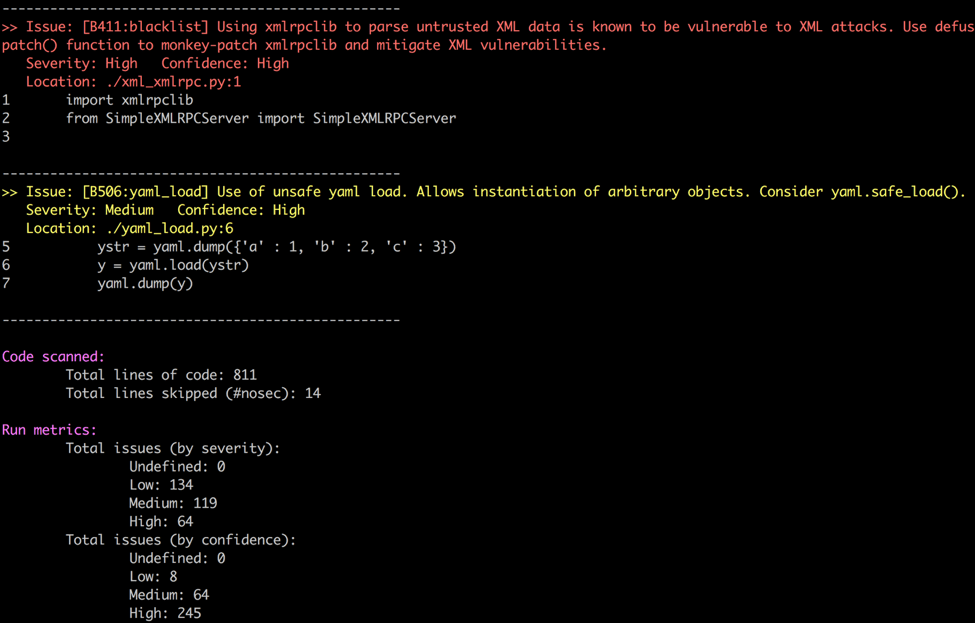
3. Bandit
This is a tool originally developed by the OpenStack Security Project, it analyzes our code to find common security issues such as:
- Use of assert
- Hardcoded passwords
- SQL injection
- Binding to all interfaces
- Weak cryptography
- And many others
You can run bandit like this:
bandit -r --exclude='venv' .
You can expect something like this if a vulnerability is found:
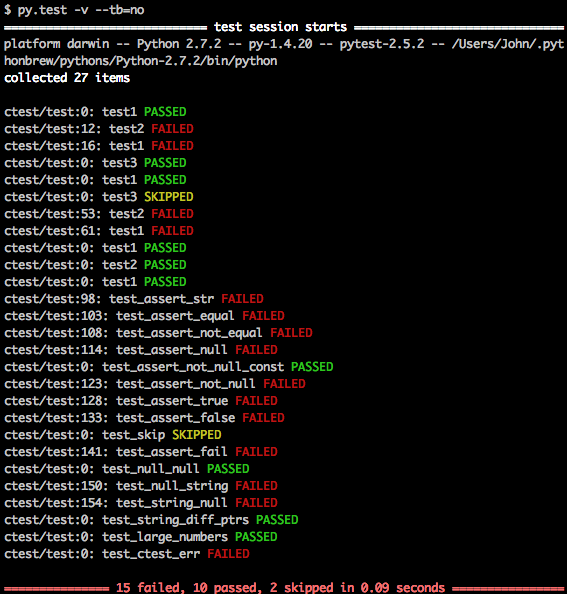
4. The test suite
After all of the static analysis stages pass, it makes sense to run our test suite to see if we broke something.
python manage.py test -k -v 2
5. Deployment
This is stage in particular deserves its own blog post because it is an extensive topic, there are a lot of strategies and you should take your time to choose the approach that suits you best.
First, you have to decide: do you want to PUSH your release from the CI server to your server? or do you want your server to PULL your release whenever it is ready?
For a push strategy, you can:
- Use dpl for Heroku
- Use sshpass to remotely execute commands on your server
- Build a push a Docker image to the Docker Registry and update your containers from whatever you're using (Rancher / k8s)
For a pull strategy, you can:
- Have a cronjob that pulls your changes from Git and executes build.sh when it detects a new release.
Gitlab CI
Now that you understand the idea behind CI pipelines and their stages, you just need to automate it. We can use Gitlab CI for this and instead of duplicating their official documentation, I'll just an example of a .gitlab-ci.yml file that you can use for your project. Notice how I:
- Establish what folders to cache between stages so I don't have to install the pip requirements everytime
- Specify which image to run my pipeline on. Gitlab CI uses Docker for this.
- Install the chrome driver to run Selenium for my functional tests, but only on my test stage.
- Specify how Gitlab can retrieve the test coverage (reported by coverage.py)
.gitlab-ci.yml:
image: python:3.6

services:
  - postgres:9.6
  - redis:3.2

variables:
  PIP_CACHE_DIR: "$CI_PROJECT_DIR/.cache/pip"
  POSTGRES_DB: myproject

cache:
  untracked: true
  key: "test"
  paths:
    - .cache/pip
    - venv/

before_script:
  - python --version
  - pip install virtualenv
  - virtualenv venv
  - source venv/bin/activate
  - pip install -r requirements.txt

stages:
  - pep8
  - radon
  - bandit
  - test

pep8:
  stage: pep8
  artifacts:
    paths:
      - .cache/pip
      - venv
  script:
    - flake8 --exclude='.git,venv,*migrations*,static/lib' .

radon:
  stage: radon
  artifacts:
    paths:
      - .cache/pip
      - venv
  script:
    - radon cc -s -a --ignore='venv' .
    - radon mi -s --ignore='venv' .

bandit:
  stage: bandit
  artifacts:
    paths:
      - .cache/pip
      - venv
  script:
    - bandit -r --exclude='venv' .

test:
  stage: test
  variables:
    DATABASE_URL: "postgresql://postgres:postgres@postgres:5432/$POSTGRES_DB"
    DISPLAY: ":99"
  artifacts:
    paths:
      - .cache/pip
      - venv/
  script:
    - wget -q -O - https://dl-ssl.google.com/linux/linux_signing_key.pub | apt-key add -
    - sh -c 'echo "deb [arch=amd64] http://dl.google.com/linux/chrome/deb/ stable main" >> /etc/apt/sources.list.d/google-chrome.list'
    - apt-get -y update
    - apt-get install -y google-chrome-stable
    - apt-get install -yqq unzip
    - wget -O /tmp/chromedriver.zip http://chromedriver.storage.googleapis.com/`curl -sS chromedriver.storage.googleapis.com/LATEST_RELEASE`/chromedriver_linux64.zip
    - unzip /tmp/chromedriver.zip chromedriver -d /usr/local/bin/
    - python manage.py migrate auth
    - python manage.py migrate sites
    - python manage.py migrate
    - python manage.py collectstatic --noinput
    - coverage run manage.py test -v 2
    - coverage report
  coverage: '/TOTAL.+ ([0-9]{1,3}%)/'
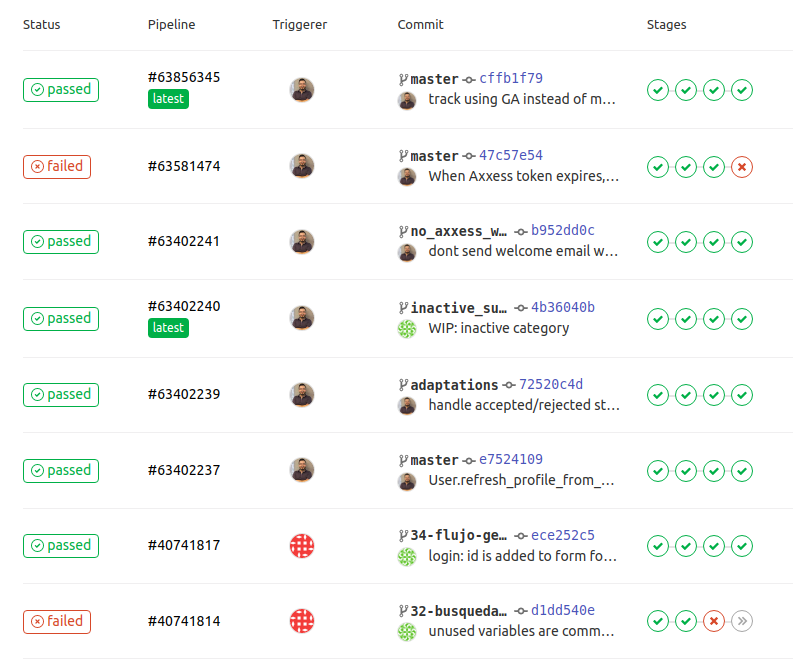
With this, Gitlab CI will run your CI pipeline everytime a change is pushed and the result will look something like this:
Conclusion
More than a tool, CI/CD is a set of tools and practices to allow your team be more productive and focus on the fun and creative parts of the job. Adopting CI/CD is the first step into reducing risks on your releases and quickly adapting to business requirements and user needs.